Table Of Content

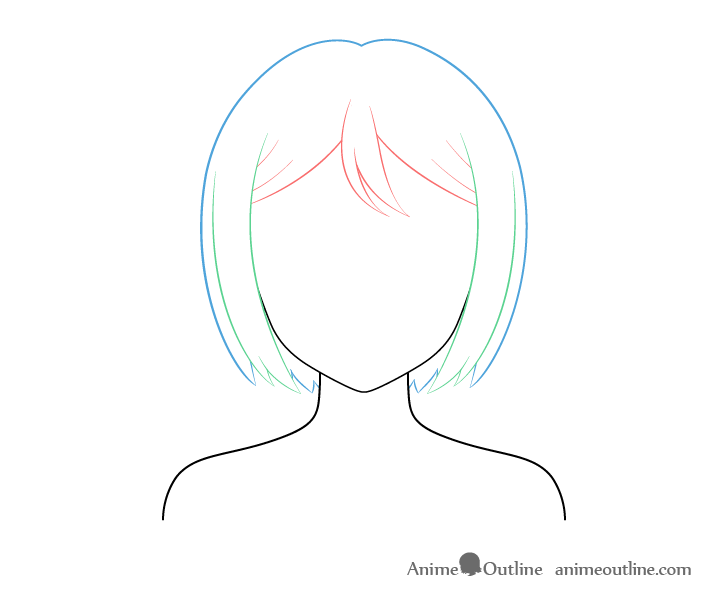
Draw the “front hair splitting into fairly small clumps and do the same for the ends of the “side hair”. Draw the background hair with a slightly split to one side and the two curves that come out of it eventually transitioning into hair clumps on each side of the head. Draw the “side hair” with light curves somewhat “hugging” the face.
Elements of Art – An Analysis of the Seven Art Elements
With all of the shadows in place you should have a finished drawing of the hair buns. To shade the hair first fill in it’s entire area with a solid grey (or color). Inside the hair you can outline several sets of highlights that will show light reflecting form it’s surface.
How to Draw Hair in Manga and Semi-Realistic Styles
The shape of the sketch should be as symmetrical as possible, especially since the portrait is face-on. Straight hair usually is not very voluminous, so you don't have to add a lot of distance. Draw the outline of the bangs, or move the hair to the sides. Place a pair of larger shadows along each of their bottoms with smaller/narrower shadows along the bottom or side facing folds.
Step 3 – Draw the Hair Along the Sides of the Head
Same as the ponytail example you can see that this particular drawing can pretty much be broken down into the front and back section of the hair. With the “back hair” split into the hair covering the head and the pigtails. For this particular hairstyle draw the front hair clumps going far enough down the face to fully cover one eye. For the “side hair” you can draw the section on the side of the covered eye somewhat blending into the front hair. Curly hairstyle tend to be less common in anime and manga than straight hair. They also tend to be more detailed and thus a little more challenging to draw.
Manga and anime, my how you’ve changed! - SoraNews24
Manga and anime, my how you’ve changed!.
Posted: Tue, 08 Oct 2013 07:00:00 GMT [source]
Step 6 – Add Shading to Finish the Messy Hair Drawing
You can draw some that are wavy and some that juts curve in one direction. Next add some folds in the “back hair” to give a bit more definition of it’s shape as well so that it does not just look like a flat cut out. Erase the parts of the head hidden by the hair and add a few lines to show the inner folds of the front and back hair. You will generally want to position these folds in between the hair clumps as that is where these will usually tend to form in real hair.
Did this article help you?
This is, in my opinion, the main reason why things don’t always turn out well. This may seem counterintuitive because when we think of hair, we think of small strands. In fact, when I do, I turn off the pen pressure sensitivity completely so I can paint as evenly as possible.
We can also start to use ghost lines to assist us in making more refined lines in the correct directions. We want to make sure that we give the eyes some detail, this is because we will be drawing hair with detail. You want to make sure there is consistency in the character design. Drawing hair is not an isolated task within the genre of anime.
Sweat Drops & 11 Other Visual Tropes That Are Uniquely Anime - CBR
Sweat Drops & 11 Other Visual Tropes That Are Uniquely Anime.
Posted: Wed, 08 Sep 2021 07:00:00 GMT [source]
Start by filling out the entire area of the hair with grey (excluding the highlights). If you would like to create a colored drawing instead then simply use any color you like instead of the grey. Unless drawing digitally you should start the tutorial in pencil and make light and easy to erase lines as you will need to do some erasing in a few of the steps.
Step 3
It’s tough to draw things when you don’t check what they look like in real life. Clean up the drawing by erasing the parts of the head hidden by the hair. Make the “back hair” pretty much following the shape of the head. Make the “back hair” pretty much curve around the shape of the head. You can first draw some lines at the base of the curves to indicate the volume of the hair that will then transition into the sort of “spires” of hair below. This will be the “front hair” tucked underneath the sides which will be combed down over top of it.
Making sure that our female character has feminine qualities is going to contextualize the hairstyle as feminine. Of course, a hairstyle can do this on its own, but working with more than a single factor in character design is going to emphasize the hairstyle a little more. Let’s look at a more realistic hair formation, where we explore the potential of line work to bring emphasis to the structure of the hair. We want to look at how the character can be enhanced by the addition of a hairstyle, which can transform the overall aesthetic of the character.
A wavy hairstyle can be successfully drawn with very few lines, if you shade it properly. The guide lines are done, so let's get to the main drawing now! Copy the rhythm lines along the strands to make them more detailed.


No comments:
Post a Comment