Table Of Content
I often merge all my layers instead of leaving several as I prefer to draw that way, but it is best to keep all your layers separate. Keeping them separate will make you more methodical and, more importantly, allow you to go back if you feel that you made mistakes during the process. People often prefer to have a specific part of the drawing in each layer. For example, a layer with the finished lines just below the layer with the base colors, a layer for the shadow, a layer for the light, etc. This will help you see the effect of the hair on the composition before actually drawing it. If you don’t know which color to use, you can take the hair color, create a new layer, set the blending mode to Add (Glow), and then add blobs, triangles, lines, etc.
Manga
Repeat the step above, and this time add some details like loose strands of hair to add dynamism. Start by drawing the head and hairline as all the other examples. Same as other examples draw the head and hairline to start. You can pretty much draw these at random but try and somewhat follow the outer curve of the bun with at least a few lines. This will help create that sort of “ball of yarn” look that hair buns tend to have.

Featured Articles
The brush for lineart can be the same as for sketching, but this will depend on how you want it to look. I highly recommend looking at the standard brushes or checking Clip Studio Assets. There are many fun brushes you can easily download and use. You don’t need to over-zoom and glue your face on the screen to be sure the lines are perfect!
New AI Program Purports to Let Even Beginners Make High-Quality Anime Character Portraits - Anime News Network
New AI Program Purports to Let Even Beginners Make High-Quality Anime Character Portraits.
Posted: Thu, 10 Aug 2023 07:00:00 GMT [source]
Step 5: Repeat
After adding the highlights you can shade the hair a light grey or make it just about any color you like. Matthew has been creating drawing and painting tutorials since the relaunch in 2020. Through his involvement with artincontext.org, he has been able to deepen his knowledge of various painting mediums. For example, watercolor techniques, calligraphy and lately digital drawing, which is becoming more and more popular.
10 Anime With The Worst Character Designs - CBR
10 Anime With The Worst Character Designs.
Posted: Fri, 24 Apr 2020 07:00:00 GMT [source]
Male Anime Hair

However, it is a very distinct style that can be interesting to draw. For this particular hairstyle you can begin drawing the hair with the section that runs along the forehead (shown in red). As is traditional for the anime/manga style draw it as a series of pointy clumps. Start with the large on in the middle and then add the ones to each of it’s sides. Hair buns are an interesting and easily distinguishable hairstyle.
How To Draw Anime Hair [ 6 Styles ]
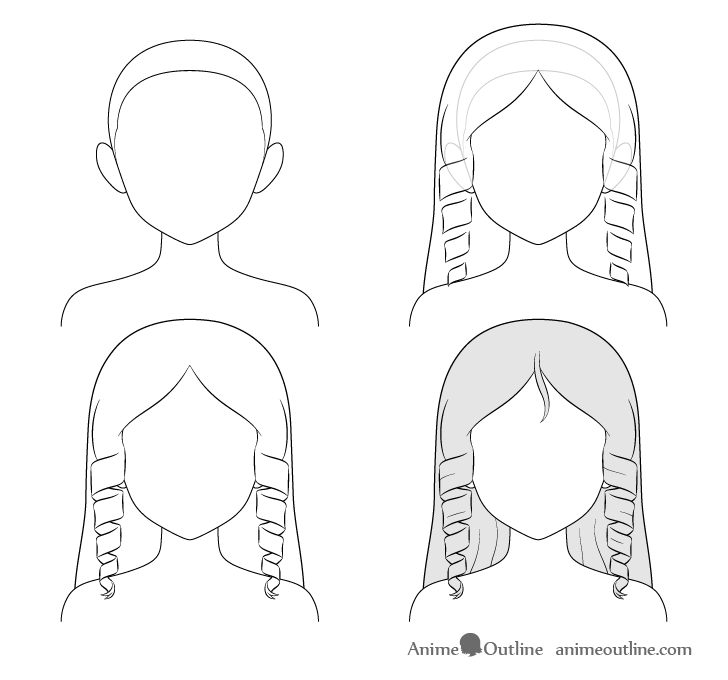
In this example the buns are drawn in a fairly generic way but there are plenty of variations in the anime/manga style. Some artists may draw them much closer to real hair while others simplify them even further and show each bun as just a sphere. Before starting on the hair make a basic outline drawing of the head, neck and shoulders. You can watch it for a detailed breakdown of the drawing process (shown line by line) and read the more in depth instructions below. Now, erase your sketch and outline your hair following the shapes you’ve created.
Step 1
The hairline in this example will be particularly useful for placing the front part of the hair. For the actual pigtails draw them similar to the “Ponytail” example vaguely resembling two questions marks in their overall shape with one being flipped over. For trimmed hair draw the hair clump with flat ends that look like they’ve been cut off by sissors.
Step 6 – Add Shading to Finish the Messy Hair Drawing
Draw the back hair with a fairly obvious split in the middle with two curves going in each direction. This will help show that the hair has sort of been neatly combed to each side. Add a few more lines to indicate some folds in the hair to the pigtails and optionally some shading. In this example a large section of the hairline will be visible in the final drawing.
Step 8
Another way to do this is to be less emphatic with the lips, this way they seem more muted which is a common characteristic of male anime characters. Take your time working on the features of the male anime character. Some ways to give a masculine quality to the character is to make the eyes more square and the jawline more squarish.
This tutorial shows how to draw curly anime or manga style hair. It consists of six steps with easy to follow examples as well as a video. What starts to give the hair more definition is the outline of the hair structure and how it sits on the head. This means we can fill in the entire hair structure and keep adding these jagged edges to create shape in the hair. We can draw this hairstyle by establishing the fringe with a basic zig-zagged pattern. Once we have done this, we can start to fill in that pattern to create a less detailed effect in the hair.
As this area is somewhat hidden less light will tend to reach there. You can see the main stages of the tutorial in the preview image above but there are additional illustrations in some of the steps. Next, add a shadow on each side of the pulled back back part of the hair. Matthew Matthysen is an educated multidisciplinary artist and illustrator.


No comments:
Post a Comment